This post may contain affiliate links. Please read our disclosure policy here.

3/31/2009

Chocolate covered Marshmallow eggs

Okay, the over whelming consensus was that the Martha eggs looked too difficult. I thought it was pretty darn cool that you had to peel them out of a real egg shell though! But I admit that I am crazy. So we are going to try it again. This time with chocolate covered marshmallow eggs. They are Hubby's favorite, so I thought I might try to make some this year!

This one comes from Roots and Wings Co:


Okay, this is my favorite part! Look at how they got the marshmallow in the egg shape. You make a mold with flower and an egg:


And then you fill the space with marshmallow:


I love it because it guarantees that they won't get stuck. I am the queen of getting marshmallows stuck. If I would have come up with this tutorial on my own I would have used the plastic Easter eggs that open the wrong way and greased them and then my marshmallows would have gotten stuck. Even though in theory it should have worked, they would have gotten stuck.

Their way, no getting stuck! Brilliant!

If you don't have a marshmallow recipe, you can find their recipe here. And if you have never had a homemade marshmallow I will tell you now, yes, it is worth the effort.

Okay, back to the candy! After the marshmallows set they look like this:

And then you cover them in chocolate like this:

You melt 2 cups of chocolate chips and tablespoon of shortening (thins it out and makes it shine) in the microwave with the classic nuke and stir technique.

And then you eat them. Well, actually they decorated them. But you could just eat them. Or you could decorate them. Or you could let your kids dump a bunch of Easter colored sprinkles on them. Your choice!

I Almost Forgot About April Fools!!

I cannot believe that tomorrow is April Fool's Day and I completely almost forgot about it!

Here is the email from Martha that reminded me tomorrow is April Fool's Day:


Transform milk into an unpourable mass:

Stir 1 packet of powdered gelatin into 2 tablespoons of water, and let stand for 5 minutes. Warm 2 cups of milk in the microwave. Stir the gelatin mixture into the milk. Transfer to a glass pitcher or bottle, and refrigerate until set, about 2 hours.

I would love to post more, put I am about to walk out the door and will be gone for most of the day! So I need your help! Tell me what you do for April Fools Day!

You can leave your pranking plans in a comment or post them on your blog and leave a link in the comment section. One of these days I will figure out Mr. Linky, but today is NOT that day!

Baseball Card Table

My son has recently inherited his father's old baseball collection. He spends hours organizing and reorganizing the thousands of cards. Maybe even tens of thousands. Okay I might be exaggerating a little when I say tens of thousands, but only a little. There are a TON. And Toots keeps getting in to them and dumping them and if you think 52 card pick-up is fun you should come over sometime.

I would love to burn them do something cool with them and I like this idea from Ikea Hacker:

That is the top of a Lack side table from Ikea. Mathew glued some baseball cards to the top of a table and then covered it with two layers of gloss and a layer of resin. I am pretty sure my boys would think that was pretty cool!

He doesn't have a table or desk in his room (although he probably could use one) but I think that I am going to use this technique on the back of his bookshelf. Not the back that is hidden against the wall, but the inside that you look at. You know what I am talking about right? I think it would be pretty fun and a great way to use up some of that baseball card stash!

3/30/2009

Doily Ideas

I received an email from Jean last week asking me if I had any ideas for doilies. I had a couple for paper doilies, like these Christmas ornaments and these Valentine's envelopes, but nothing for the beautiful crocheted doilies. So I have been looking. I found a couple, but this one is my favorite:

This runner from Donna Hay, is made from sewing doilies onto a soft and slightly transparent cotton. If you hang the doilies over the edge of the fabric then you will still be able to see the beautiful designs. Jean, I hope this works for you. Now I have to find some vintage doilies!

Chocolate Eggs

I won't be making too many of these because if I did I would be eating too many of these. But my kids will be getting at least a couple in their baskets from the Easter Bunny:

Can't you tell they are from Martha Stewart just by the gorgeous plate they are sitting on! They are chocolate eggs that are in real egg shells. You blow out the eggs, sterilize them and then make a chocolate shell by coating the inside of the egg with melted chocolate and letting it set. Once the shell sets, you fill the rest of the egg with ganache. Have I mentioned that I think ganache is from the gods?

Who am I kidding. I will be eating at least a dozen of these.

Napkin Rabbit

I found this cute bunny napkin idea on Sunday Baker:

She shows you step by step pictures on how to fold the paper napkin on her blog. Of course she plans on using cloth napkins for Easter. She got the idea from Martha. And with a little practice you can make them look like Martha's bunny napkins:


Here are the instructions:

Clear as mud? If you have any questions you will have to ask Sunday Baker or Martha Stewart because I have yet to master them! It doesn't really matter, because no matter what they look like Toots will call them Puppy! Puppies are her new favorite thing. Bolt, birds, Otters. They are all Puppy!

3/29/2009

Easter S'mores

eaMy friend Michelle posted these on her blog:

First of all, it doesn't really matter what you make with them because they are cute Cute CUTE!

But they are Easter S'mores. You crush an entire sleeve of graham crackers into crumbs, 8 marshmallow bunny peeps, 1 1/4 cup Easter M&Ms & 1/3 cup brown sugar into a glass jar. Layer it to make it really cute! And here are the directions for baking:

Empty the contents of the jar into a bowl.

Snip the bunnies into bits with kitchen sheers or a knife and then return the bunny bits to the mixture. Mix well. (I think I would actually just spread them out on top and leave them whole)

Melt 1/2 cup butter and pour melted butter and 1 teaspoon vanilla over the dry ingredients. Mix well.

Pat mixture into greased 9" square pan.

Bake at 350 degrees for 15 minutes. Cool and cut into bars.

(Makes 9 to 12 bars.)

Gooey Chocolate Frosting

The Boy had quite the weekend. He had a baseball game and two birthday parties to attend. Lou La, a little sad that her social calendar was not as exciting as his, tried to make him promise that he would only eat cake at one of the birthday parties. I guess she thought that would make her feel better. Needless to say, The Boy did not oblige.

On Friday night, after we dropped The Boy off at his sleepover, Lou La and I came home and made cupcakes. I decided that I wanted to try Yellow Cupcakes with Sticky Chocolate Icing from The Pioneer Woman. I had never tried one of her recipes and thought this would be a good one. You know, to see if they really are that good or if it is just her beautiful photography that makes me want to try everything she posts.

So, we baked. Lou La helped every step of the way and we made yellow cupcakes from scratch. Then after they cooled we made the sticky chocolate icing.

I have to say that the cupcakes really weren't anything special, but that icing was pretty darn tasty. Like definitely going to be using it again tasty. And I see it being used on some brownies in the near future.

And I am going to have to try these cupcakes from Miss Cupcake Face:


They are peanut butter. Mmmmmmmmmm! And she modified the frosting recipe and added a touch of salt and some vanilla extract. I think I might need to make some more cupcakes. Off to the store to buy some more cake flour.

To make the gooey chocolate frosting you can use the recipes on either of the links, but basically you take 3/4 cup sweetened condensed milk, 2 Tbs of butter and 6 oz of chocolate (they suggest semi sweet, but next time I am going to use 3 oz of bittersweet and 3 oz of milk chocolate) and melt it all together on medium low heat. Then you pretty much spoon it over the cupcakes. It sets up in a few minutes and is gooey and shiny and perfect. The recipe made enough to frost 12-18 cupcakes.

Try not to eat it out of the pan.

Egg Shaped Sidewalk Chalk

When I did a Google search for Chalkboard eggs and found these cute blue ones from Skip To My Lou I couldn't figure out how I had missed them on my Reader. I subscribe to her blog and love it! So I went back and took a look. It is because the post that Google found was from March of 2007. Which reminded me that I have to go back and look at ideas that people posted last year, and now it seams the year before, because there are so many great ideas lurking in the Archives. Sitting there unloved by me because I wasn't a blog reader last year! *gasp* I know! Crazy!

So I went and looked at more of her Easter ideas from 2007 and found this cute sidewalk chalk made in Easter Egg shapes:

You will need plaster of Paris, tempera paint, petroleum jelly, plastic Easter eggs, disposable cups, disposable spoons or wooden craft sticks, an egg carton and this photo tutorial from Skip To My Lou.

3/28/2009

Easter Egg Topiary

Lewa's Designs sells wall stickers and she has a cute bunny out for Spring. She just posted a picture of it on her blog and I fell in love. But it isn't the bunny I fell in love with. Check out the cute Easter Egg Trees she posted on her blog (with the cute bunny in the middle):

So now I am on the lookout for a cheap topiary that I can hot glue Easter Eggs to!

Cupcake Wraps

Found a video tutorial with a cute way to turn a napkin and ribbon into a cupcake wrap
(you might want to turn your volume down, the music was a little loud for me):


You can check out Mary's blog here.

Sit or Squat

Yes, I just titled a post Sit or Squat. But there is a really good reason! It is the name of a very helpful website:
Sit or Squat (sponsored by Charmin) is a site to find (and post) bathrooms all over the world. So if you are on a road trip and need to know where to stop (or if you are in downtown Phoenix with a little girl who has to go to the bathroom every 5 seconds when we are away from home) then you can look up the closest location.

You can rate bathrooms and give reviews. And you can even add pictures! All great tools to stay away from scary restrooms and find changing tables when you need one!

Doesn't make your house cuter, but might make your next trip a little better!

3/27/2009

What Would You Do?

If someone gave you two thousand dollars but told you you couldn't do anything rational with it, what would you do?

You can't pay off debt or invest it or spend it on anyone else. You can't donate it or buy groceries. Nothing that is a need.

What totally irrational thing would you do?

Do you want to know what I would buy? I would buy this:

and this:

and this:

and have a party with cotton candy (that is what the first picture is by the way, a cotton candy machine) and popcorn and snow cones. Is that crazy? It is so a weird dream of mine to own all three. And real life industrial circus quality. Not the snow cone makers you can buy at Target...although that might have to do until some stranger gives me $2000.

Shadowbox Hearts

Remember these butterfly shadowboxes:

image from Kim Payne


picture from Natalie

I still haven't made one because I don't have a butterfly punch. And I would much rather borrow one than buy one just for a project. But I do have a heart shaped die and I found this at The Red Thread:
And I love it! Sometimes procrastination pays off!

Etched Glass Bowl

Glass etching is popping up all over the place and it keeps getting better! Sarah from Create Studio has a tutorial for this etched monogram bowl:


She used clear contact paper to make a stencil by adhering it to the bowl and using an Exacto knife to cut out the monogram. (She printed the monogram she wanted to use and adhered it to the inside of the bowl so that she could use it as a guide while cutting the contact paper).

She also gives a nice little tip...the etching cream can usually be reused! So when you wipe off a large amount like what you use in this project, you can wipe it back into the bottle! Good to know.

I want one for myself, but it would make a great personalized wedding gift. And June is right around the corner!

You can see her full tutorial here.

3/26/2009

Cookie Cake

Mmmmm. Cookies. and ice cream. And cookies. And ice cream. And cookies. Okay, you get the idea:


What a fun birthday cake! And the trail to this cakes has as many layers as the cake itself. I get a lot of questions about how I find all of the stuff that I blog about, so I thought I would use this yummy cookie and ice cream creation to answer that question!

First, I have a Google Reader with enough blogs to give people a heart attack. I think I am about to pass the 700 mark. But where did I find all of those blogs? Well lets talk about this cake. This cake is a Donna Hay creation. But until I found it I had no idea who Donna Hay was. Now I know she is the Australian version of Martha Stewart. You will be seeing more from her in the future since I just added her to the list of sites and blogs that I scout out ideas from. I am sort of in love with Donna Hay now.

But how did I find her? I subscribe to a blog called Party Perfect where I get plenty of cute party ideas from. She posted this cake on her blog after finding it on Imprintables. Which I immediately fell in love with and added to my Reader. I posted the dipped frozen bananas from her blog this morning. She got the ideas for the dipped bananas from The Red Thread. Another blog that got added to my Reader.

Now imagine doing that a dozen times a day. That is where I find all of this great stuff!

The End

Chalkboard Eggs

You knew it was coming...didn't you?

I found these for sale from The Red Thread:

She will even paint the cute bunnies on them for you.

So then I had to go looking. I knew they had to be out there. And I must have missed this when Skip To My Lou posted them earlier this week:

She painted wooden eggs with pretty blue chalkboard paint that she made. So buy some wooden eggs and make your own chalkboard paint in the color of your choice. The directions are here, but she used acrylic paint instead of latex.

Go Bananas


Frozen bananas, chocolate, and colorful nonperils. A fun treat for a summer party and a new blog, Imprintables, that I am in love with!

I apologize for talking about Summer when I know some of you haven't had the chance to even see Spring yet! But I love Summer!

Cut the bananas and insert a popsicle stick. Dip the ends into sprinkles (or chocolate and then sprinkles...or nuts...or whatever you want!!). Place them on a cookie sheet that is covered in plastic wrap, and then cover the bananas in plastic wrap and freeze.

3/25/2009

Thread Eggs

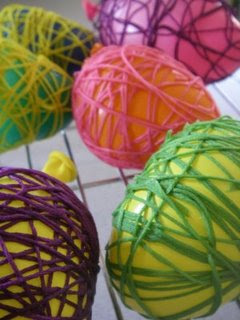
Sunday Baker posted these cute thread Easter eggs:

She blew up small balloons, soaked embroidery floss with starch and then wrapped the floss around the balloons and let them dry.

And then she hung them on on a tree:

Easter Egg Holders

They aren't the gorgeous Egg Cups that Martha has been using for everything lately, but they are a pretty fun way to display some Easter Egg Art. I found these at Zakka Life:

She decorated a toilet paper roll (or a paper towel roll) then cut a piece, glued some green construction paper inside and cut it like grass, hiding the seem with some ribbon! And it is cute enough that you almost don't have to dye the Easter Eggs. Almost!

Canopies

I have never been a canopy lover. But this is about to change all that:

I am dying to try this and see if it works! It would be gorgeous for a wedding, but since I don't know anyone getting married anytime soon I am going to have to have an outdoor tea party or something!

And for the record, never wanted a canopy bed either, but after seeing this from Domino I might change my mind:

3/24/2009

Transferware Eggs

If you love transferware then you are going to love these eggs from Country Living:

You boil eggs until almost hard in water tinted with dye. Remove eggs; tap them with a spoon. Drop additional dye over the cracks to stain them further. Boil eggs again until hard.

Now if only I had a beautiful transferware tea set to go with the eggs! Maybe I can find some in paper!

Mini Cakes and Pies

You can't eat them, but Lou La is going to love them just as much (if not more) than the real thing:


Cathie Filian has a tutorial on her blog to make these miniature cakes and pies. She uses sponges for the cakes:


and bottle caps for the pie tins:


So cute!

Lou La wanted to know if the Barbies would actually eat them when they were real. Not quite sure if she meant 'when' the cakes and pies were real or 'when' the Barbies were real. We might need to figure that out. But either way they are real cute!

Play That Record

I promise that just because I post two paper plate ideas in a row doesn't mean that I am obsessed with paper plates. We actually don't use them very often at our house, but if I keep finding such cute ideas, we might start!!

This is such a fun idea from Parents.com:

Mix them with these cupcakes from Parenting.com


and I see an American Idol party in my future! Annie, that means YOU are supposed to have an AI party and invite me to it!

3/23/2009

Pretty Paper Plates

I love this idea from Country Living:

Love the plates. Love the charger look. I love the polka dots and flowers. I love the coordinating/mismatched napkins. I love that they are paper. Because honestly, how wants to wash dishes after a party! And with paper this cute, who needs real dishes!

Rice Krispy Pops

I love this idea from Country Living:

Is it bad to say that I am pretty sure I could make them cuter than that!

Make a pan of Rice Krispy Treats, cut them out (think of the cute spring cookie cutter shapes you could use!!!), stick them on a Popsicle stick and dip! Dip them in chocolate, white chocolate, or one of a million fun spring colors you can get in candy melts. Then decorate them with sprinkles. Again, there are a TON of cute colors and designs!

I am going to try standing them up in a Styrofoam block so that I don't have to lay them down while they set up.

I am so glad I bought those tulip cookie cutters!

Hang Your Hat

I love door knob coat racks like this:


And you can check out the DIY tutorial for the one pictured above at This Old House. I *heart* This Old House. I used to watch it with my dad and listen to him talk about all the tools that they used. But that is totally off topic.

But I found another idea that I think is pretty clever. Instead of doorknobs they use finials. They are made to screw into curtain rods, so they already have the screws attached to them. You just screw them right into the wall. Much less work! And you can find some pretty neat ones:

image from BHG

3/22/2009

Egg Cup Bouquets

I am pretty sure that Martha Stewart must own stock in a company that sells Egg Cups. Because she seems to have made it her personal mission to provide so many great ideas to use dozens of them that no one will be able to resist buying them.

The latest is this centerpiece for Easter:


You can check out some of my other favorite ideas like the Easter Egg Votives and the Heart Centerpiece.

Raspberry Cream Cheese Buns

Today is our last official day of Spring Break. Starting tomorrow we have to get back on the regular routine. Baseball practices, chores, piano, bedtime, the works. So today I am going to bake! With reckless abandon. Because It is back to my gym routine tomorrow too.

While looking for yummy things to make I found these:


This recipe is for Raspberry Cream Cheese Buns. The recipe is supposed to be a Magnolia Bakery recipe, but I have never been to Magnolia and that really doesn't matter. What matters is that they look YUMMY!

What you need:

1 3/4 cups all-purpose flour
1 teaspoon baking powder
1/2 teaspoon baking soda
1/4 teaspoon salt
1/2 pound (one 8-ounce package) cream cheese, softened
1/2 cup (1 stick) unsalted butter, softened
1 cup sugar
2 large eggs, at room temperature
1/4 cup milk
1/2 teaspoon vanilla extract
1/2 cup raspberry preserves
confectioners’ sugar

What you do:

Preheat oven to 350 degrees.

Grease and lightly flour 9 large muffin cups.

In a small bowl, combine the flour, baking powder, baking soda, and salt. Set aside.

In a large bowl, beat together (on medium) the cream cheese, butter, until smooth and sugar until smooth (about 3 minutes) Add the eggs and beat well.

Add the dry ingredients in two parts, alternating with the milk and vanilla. Spoon the batter into the muffin cups, filling them about two-thirds full. Drop 3 small dollops (about a teaspoonful each) of raspberry preserves onto the top of each bun and, using the tip of a sharp knife, swirl the preserves into the batter, forming a decorative pattern. Bake for 25–30 minutes, or until a cake tester inserted in the center of the bun comes out clean.

Allow the buns to cool for about 30 minutes before sprinkling with confectioners’ sugar and serving.

Yum!

Planter Makeover

I love spring. I love the weather and the flowers and the colors. So we have to be creative in keeping the color around as long as possible. These colorful planters are a great way to do that:

image from BHG

They started as regular plain redwood planters, but got a spring face lift with some trim, paint, and legs.

3/21/2009

Spring Wreath

Country Living has this wreath made from Jordan Almonds:

You take a 12-inch Styrofoam wreath and hot glue jordan almonds in place. Start from the inside and work your way out. Hang with ribbon (they used rickrack). And you have a wreath that is cute cute cute!

Cloth Easter Eggs

Retro Mama has a tutorial on her blog for these cute cloth Easter Eggs:


She has the pattern on her blog and step by step pictures to turn these:

into these:

And when I say that you can make these, you can REALLY make these. Now all I have to do is find that really cute cake plate at Target!