Ruffled Fondant Cake from Sprinkle Bakes
This post may contain affiliate links. Please read our disclosure policy here.
Showing posts with label fondant. Show all posts
2/19/2013
6/02/2011
5/10/2011
2/15/2011
10/17/2010
Candy Corn Fondant
From Glitter to Gumdrops took candy corns:
And used them to create these fondant-like cutouts:
And because the only ingredient is candy corns, it will taste better than just about any fondant recipe, even marshmallow fondant. Unless you happen to not like candy corns!
You can see Christy's tutorial HERE.
And used them to create these fondant-like cutouts:
And because the only ingredient is candy corns, it will taste better than just about any fondant recipe, even marshmallow fondant. Unless you happen to not like candy corns!
You can see Christy's tutorial HERE.
8/25/2010
Lace Cake Tutorial
Kalleen from At Second Street posted this wedding cake that she made last week:
I really wanted to know how she made the lace like flowers, so I was thrilled when she posted a tutorial for it! You can check out how she turned fondant into doilies HERE. I'll give you a hint, I now want a pasta machine!
6/28/2010
Fondant Beach Towel
Sweet Creations has a tutorial to make this cute striped beach towel out of fondant:
Now I just need to find a reason I need a cute striped fondant beach towel!
2/15/2009
How To Make Marshmallow Fondant
I realized that the only place I had this recipe was on a Halloween post, so I thought it deserved a post of its very own!
What you need:
16 oz mini-marshmallows
2-5 T water
2 lbs powdered sugar
½ c shortening (or more! Just keep the shortening out!!)
Put the marshmallows and 2 T of water in a microwave safe bowl. Microwave on high for 30 seconds, stir, microwave for another 30 seconds, stir, continue until it is melted. Dump 3/4 of the powdered sugar into the bowl. Grease your ENTIRE work space with the shortening and then grease your hands with shortening. Dump out the marshmallow/sugar mixture and kneed it like you would bread dough. Slowly add the rest of the powdered sugar and keep kneading. You will know when it is done. It will look like this:

Then coat the ball with shortening, wrap it in plastic wrap, put it in a Ziploc bag (squish all the air out) and put it in the fridge over night. It is messy, but really easy and CHEAP and fun! And your hands are really soft when you are done.
If you want to make colored fondant, add some gel food coloring to the fondant and knead it in. Add more until you get the color that you want. And wear gloves if you don't want your hands to turn colors. This stuff will last a good long time in the fridge if you wrap it up tight enough, so you can make it ahead of time.
This is what I used my very first batch of marshmallow fondant to make:
Super Hot Mama told me about this recipe back when I was planning these cupcakes for The Boy. She found it on Whats Cooking America. It is great stuff! Give it a shot!
What you need:
16 oz mini-marshmallows
2-5 T water
2 lbs powdered sugar
½ c shortening (or more! Just keep the shortening out!!)
Put the marshmallows and 2 T of water in a microwave safe bowl. Microwave on high for 30 seconds, stir, microwave for another 30 seconds, stir, continue until it is melted. Dump 3/4 of the powdered sugar into the bowl. Grease your ENTIRE work space with the shortening and then grease your hands with shortening. Dump out the marshmallow/sugar mixture and kneed it like you would bread dough. Slowly add the rest of the powdered sugar and keep kneading. You will know when it is done. It will look like this:
Then coat the ball with shortening, wrap it in plastic wrap, put it in a Ziploc bag (squish all the air out) and put it in the fridge over night. It is messy, but really easy and CHEAP and fun! And your hands are really soft when you are done.
If you want to make colored fondant, add some gel food coloring to the fondant and knead it in. Add more until you get the color that you want. And wear gloves if you don't want your hands to turn colors. This stuff will last a good long time in the fridge if you wrap it up tight enough, so you can make it ahead of time.
This is what I used my very first batch of marshmallow fondant to make:
Super Hot Mama told me about this recipe back when I was planning these cupcakes for The Boy. She found it on Whats Cooking America. It is great stuff! Give it a shot!
7/13/2008
Embossed Frosting
Yet another idea I need to remember! This would be sooooooo easy to do and so cute! I believe these were actually embossed by hand, but they sell about 100 tools to make designs on fondant.
6/10/2008
Making cupcakes with fondant
(aka Toni you can totally do this!!)
Okay, I realized that I posted all about making my fondant cupcakes and never talked about the recipe or how I did it (since I was elbow deep in powdered sugar and food coloring at the time!!)
I broke it down into a couple days which made it a LOT less stressful. And the marshmallow fondant sets up really nice if you let it sit in the fridge over night before using.
I used the recipe here. I was going to just use store bought fondant (there is a GREAT cake supply place in Phoenix, but you can also use Wilton brand) but I am not a fan of the taste and it can be pricey. A friend of mine made a wedding cake a couple weekends before the boy's birthday and recommended this recipe. You can see her in action here and her blog header is the cake she made! She is SUPER talented. Almost TOO talented!
Okay, so here is the way I did it and suggestions if it is your first time using fondant.
1) USE THIS RECIPE!! It is cheap, easy to work with and tastes about 100 times better than regular fondant. It tastes like those orange circus peanut candies.
2) CUPCAKES!! Not a cake for your first time. If you are doing a cake you have to roll out a huge piece of fondant, all one thickness, have a perfectly level cake, AND successfully transport the fondant TO the cake in once piece. Too much stress! Start small!
3) If you are decorating cupcakes with fondant, fill the cupcake with frosting. Most people will admire the fondant and then take it off. Maybe eat a bite or too. So give them some frosting! :D
4) If you have time: Make the fondant one day. Let it sit overnight and then color it the next day. Let it sit again and then decorate the next day. (three small projects instead of one). If I had tried to do it all at once I think I would have gone crazy trying to make the decorations!!
5) Use a LOT of Crisco on your rolling/kneading surface when you are working with the fondant. There is a lot of hand kneading, but it isn't hard. If you have plastic gloves use them. Especially when you are dying the fondant. You have to put the gel food coloring in and kneed for a while until it is evenly distributed. Your hands will be so pretty when you are done if you don't wear some type of glove.
6) Use a round cookie cutter the size of a cupcake top. Roll out the base color (mine was blue) and cut out enough circles for your cupcakes. Frost the top of the cupcakes with a little butter cream frosting (this is your 'glue') and just place each circle on your cupcake.
7) Have fun decorating them!
8) When you figure out how easy it is, don't tell anyone! Let them just be impressed! ;D
If you have any questions feel free to call me or email me. If you don't have my number, email me and I will give it to you. (You should be able to email me through my profile here on blogger).
Okay, I realized that I posted all about making my fondant cupcakes and never talked about the recipe or how I did it (since I was elbow deep in powdered sugar and food coloring at the time!!)
I broke it down into a couple days which made it a LOT less stressful. And the marshmallow fondant sets up really nice if you let it sit in the fridge over night before using.
I used the recipe here. I was going to just use store bought fondant (there is a GREAT cake supply place in Phoenix, but you can also use Wilton brand) but I am not a fan of the taste and it can be pricey. A friend of mine made a wedding cake a couple weekends before the boy's birthday and recommended this recipe. You can see her in action here and her blog header is the cake she made! She is SUPER talented. Almost TOO talented!
Okay, so here is the way I did it and suggestions if it is your first time using fondant.
1) USE THIS RECIPE!! It is cheap, easy to work with and tastes about 100 times better than regular fondant. It tastes like those orange circus peanut candies.
2) CUPCAKES!! Not a cake for your first time. If you are doing a cake you have to roll out a huge piece of fondant, all one thickness, have a perfectly level cake, AND successfully transport the fondant TO the cake in once piece. Too much stress! Start small!
3) If you are decorating cupcakes with fondant, fill the cupcake with frosting. Most people will admire the fondant and then take it off. Maybe eat a bite or too. So give them some frosting! :D
4) If you have time: Make the fondant one day. Let it sit overnight and then color it the next day. Let it sit again and then decorate the next day. (three small projects instead of one). If I had tried to do it all at once I think I would have gone crazy trying to make the decorations!!
5) Use a LOT of Crisco on your rolling/kneading surface when you are working with the fondant. There is a lot of hand kneading, but it isn't hard. If you have plastic gloves use them. Especially when you are dying the fondant. You have to put the gel food coloring in and kneed for a while until it is evenly distributed. Your hands will be so pretty when you are done if you don't wear some type of glove.
6) Use a round cookie cutter the size of a cupcake top. Roll out the base color (mine was blue) and cut out enough circles for your cupcakes. Frost the top of the cupcakes with a little butter cream frosting (this is your 'glue') and just place each circle on your cupcake.
7) Have fun decorating them!
8) When you figure out how easy it is, don't tell anyone! Let them just be impressed! ;D
If you have any questions feel free to call me or email me. If you don't have my number, email me and I will give it to you. (You should be able to email me through my profile here on blogger).
5/09/2008
I made this!!!
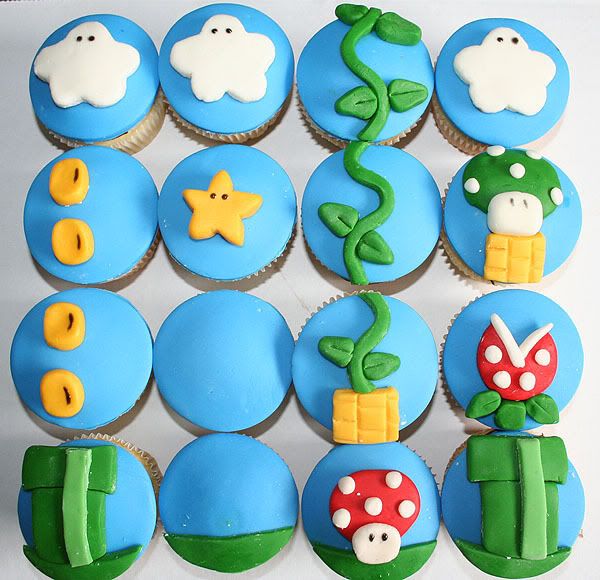
Okay, not the best picture! I was just a little excited and wanted to post this!! I still need to 'dust' off some of the cornstarch and take the pictures in some better light. But I MADE THIS! I am super excited because this is my very first time working with fondant. I definitely need more practice, but I am THRILLED at the way this came out!! I even made my own fondant!! (Thank you Janie for the recipe!!!)
The cupcake on the bottom with just grass is supposed to have Mario on it. I need to make flesh colored fondant AND buy black (for the his shoes and mustache) but I MIGHT try it if I have enough time today! I don't know that it will come out looking at ALL like Mario, but I figure I have enough fondant left over so I should give it a try. (might as well...or mine as well...right Michelle)
This is for the boys birthday party tonight. I think he will really like it! Amazing as it may be, you can NOT find Mario party supplies ANYWHERE! They don't exist. Once upon a time they used to, but not anymore. You can still find the old ones on Ebay, but I didn't have the desire to spend $40 on 10 plates and napkins! So I had to be creative! I will show pictures of some of the stuff after the party! SO FUN!
(PS - You may remember the post with the Mario cake that I was GOING to try to make...but I woke up from that dream and luckily found these cupcakes on Flickr by hello naomi that I could copy. Obviously not as cute as hers, but I thank her for the inspiration!
Subscribe to:
Posts (Atom)