The competition over at CWTS was fierce. So fierce that a project like this amazing necklace from Melissa at Honey Scraps was actually eliminated.
The necklace is beautiful and I am pretty sure I need something this cute to wear to Blissdom!
I am tickled that I get to share Melissa's tutorial with you guys!
So, did any of you guess that the Verveine Necklace for Crafting With the Stars was mine? Thank you to everyone that voted for it. I have never made (wearable) jewelry before...so this was a new experience for me!
Unfortunately, I did not make it through to Round 2...but I was very humbled to be a part of the top 12 and I look forward to playing along (minus the pressure!) in the weeks to come. :) Getting to meet all my fellow crafters and their "stars" was great! What a fun experience!
So you want to learn how to make your own necklace? Then here we go...
Materials:
beads of choice
ribbon or string for neck piece (mine is made of shoelaces)
needle and thread
1/8" ribbon
organza (for flower)
hot glue gun (or any other glue to secure your knots)
1. First, I decided what order I wanted my beads in. Then, I chose to string them with thin 1/8" ribbon. I wanted it to be sturdy (since I have a 2 year old that likes to pull!). Space your strands out to your desired length and leave about 3" of ribbon on each side.
**Make sure the center holes of your beads are large enough for whatever string/ribbon you are going to put through them. As you can see, my bottom strand of pearls are strung with black thread because my ribbon would not fit through.**
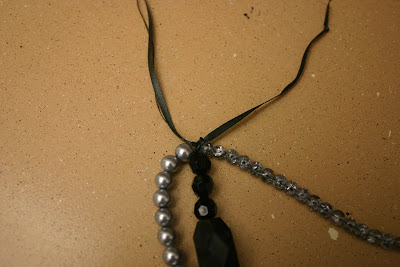
2. I took the bottom strand of beads and tied it to my middle strand of beads.
Here is what it looks like after being tied together on both sides:
3. Next, I took both strings that I just tied together (bottom and middle) and tied them to the top strand of beads.
Again, here is what it looked like on either side:
4. Now for the neck strap piece, I found a six pack of black shoelaces at the dollar store. I braided three of the shoelaces together.
To decide how long you need your braid to be...hold your beads piece up to yourself at the length you want them to fall when the necklace is finished. I pinned my shirt where that measurement was...and then used a fabric tape measure to measure around my neck from that point around to the other side.
Make the braid 1" longer than that measurement on each side.
5. Next, I took the end of my braid and fed it through a ring, folded it over and sewed right across several times with a straight stitch. Repeat with the other side of the braid.
Sorry I don't have pictures of the final stages...but I took the ribbon ends of my beaded strands and tied them onto the same rings as my braid. I knotted the ribbon, cut off the excess, and then applied a layer of hot glue around the knot to make it more secure.
For the flower, I cut five 3" circles of black organza. I took each circle and folded it once in half (to make a half circle) and then again in half (to make a 1/4 circle). I repeated with all my circle pieces and then sewed the ends all together. I then sewed it directly onto one side of my braid (covering the ring)
And that's it! Pretty easy peasy:) Once I figured out my color scheme...the actual assembly of the necklace was very easy. There are SO many different things you could do with this too. Like ribbon for the neck piece or a large silk flower on the side? I wanted to put the flower on a pin so that it could be removed and put on a sweater or something:)
Price:
ribbon: $.50
beads: $3.00
shoelaces: $1.00
organza: $.50
Total: $5.00
You can head over to Honey Scraps and check out all of Melissa's other great projects! And a big thank you to Melissa for letting me share her tutorial!


2 comments:
Grrrrrrrrrrreat job! :)
Thanks so much for posting my tutorial!! I have to still pinch myself that I saw something of MINE on YOUR blog! It was so great getting to meet you through this competition:)
Post a Comment